Home Wi-Fi Network: A Complete Guide
A Home Wi-Fi network is a wireless linkage of devices to the internet within a residential environment. This wireless network frees you from the constraints of cables and wires, providing internet access throughout your home. While setting up a home Wi-Fi network is a manageable task, it necessitates careful planning and preparation.
In this article, we will explain how to establish a home Wi-Fi network within your home and address common queries about home Wi-Fi networks.
Home Wi-Fi Network: Essential Components Needed to Establish It
To construct a home Wi-Fi network, you must procure the following equipment and services:
- An internet connection from an internet service provider (ISP).
- A modem is responsible for translating the internet signal entering your residence from the ISP.
- A wireless router serves as the manager of your home network. It creates your Wi-Fi network, assigns IP addresses, manages traffic, and ensures that all your data reaches its intended destination.
- A computer or smartphone with which you can configure your Wi-Fi network’s security settings.
- Ethernet cables that facilitate connections between your modem, router, and, optionally, your computer.
- Devices you intend to connect to your Wi-Fi network, such as laptops, tablets, smartphones, smart TVs, gaming consoles, smart speakers, and more.

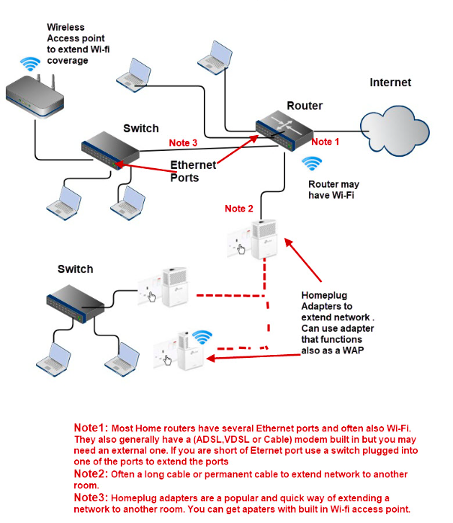
How to Extend a Home Wi-Fi Network | Photo Credit: stevessmarthomeguide.com
READ ALSO: The Future of Cybersecurity in the Age of AI (Artificial Intelligence)
Steps to Set Up Your Home Wi-Fi Network
Here is a concise outline of the steps required to create your home Wi-Fi network:
Step 1: Determine the optimal location for the wireless router.
The most favourable placement for your wireless router is in a central position, devoid of obstructions that may cause wireless interference. Avoid placing the router near windows, walls, or microwave ovens.
Step 2: Power down the modem.
Before connecting your equipment, deactivate the cable, fibre, or DSL modem supplied by your internet service provider. This precautionary measure mitigates potential conflicts or errors during the setup process.
Step 3: Establish a connection between the router and the modem.
Insert an Ethernet cable (typically included with the router) into the router’s WAN port. After doing this, connect the opposite end of the Ethernet cable to the modem.
Step 4: Establish a connection between a laptop or computer and the router.
Connect one end of another Ethernet cable to any of the router’s LAN ports (any port will suffice) and the other end of the Ethernet cable to the Ethernet port on a laptop.
Step 5: Power up the modem, router, and computer.
To ensure optimal functionality, it is advisable to turn on these devices in the following sequence: commence by activating the modem, then power up the router. Once the router is operational, switch on the computer.
Step 6: Access the router’s management web page.
Launch a web browser and enter the IP address associated with the router’s administrative page.
Step 7: Modify the router’s default administrator password (and username).
This option is usually available on the router’s administrative page, usually within a section named “Administration.” Ensure you select a robust password that is not easily forgettable. This precautionary measure thwarts unauthorized access to your router settings.
Step 8: Implement WPA2 security.
This step is of paramount importance. Locate this setting in the wireless security segment of the router’s administrative page. Choose the encryption type you wish to employ and designate a passphrase comprising a minimum of eight characters.
Step 9: Customize your Wi-Fi network name (SSID) and password.
Typically situated within the wireless settings section of the router’s administrative page, you can select any name and password of your preference, provided they are not overly simplistic.
Step 10: Unplug your computer from the router and wirelessly connect all your devices to the new network.
You can now detach the Ethernet cable from your computer and router, enabling wireless connectivity. To connect your devices to the new network, simply select your network name and input your password on each device.
ALSO SEE: The Impact of Quantum Computing on Cybersecurity
How to Troubleshoot Your Home Wi-Fi Network
If you encounter problems with your home Wi-Fi network, such as slow speeds, weak signals, dropped connections, or no internet access, you can attempt the following common solutions:
1. Restart Your Modem and Router:
- Unplug the modem and the router from their power source.
- Wait a few minutes for any temporary glitches to clear.
- Plug them back in and allow them to fully boot up.
2. Check Cables and Connections:
- Make sure all the cables are plugged in securely and not damaged or loose.
- Try using different cables or ports, if possible, to rule out issues.
3. Optimize Router and Device Placement:
- Place your router in a central location, free from obstructions like walls or appliances.
- Consider moving devices closer to the router if distance or obstacles are causing signal problems.
4. Adjust Wi-Fi Channel or Frequency Band:
- If interference is an issue, change your Wi-Fi channel or frequency band.
- Access these settings in the wireless settings section of the router admin page.
- Switch between 2.4 GHz and 5 GHz or select a different channel to reduce interference.
5. Keep Firmware and Drivers Updated:
- Update router firmware through the router admin page (often found in the Firmware Update or System Update section).
- Update device drivers either through your device’s settings or the manufacturer’s website for improved performance and security.
6. Reset Router to Factory Defaults (Last Resort):
- If other solutions fail, you can just reset the router to its default settings.
- Press and hold the Reset button (usually labelled) on the router for about 10 seconds.
- This will erase all customizations, including network name and password.
- As per the earlier steps, you’ll need to set up your network again.
Conclusion
Creating and optimizing a home Wi-Fi network is a straightforward yet essential process. You’ll need an internet connection, a modem, a router, a computer or smartphone, and Ethernet cables. Configure router settings, including security, network name, and password. With these tips and tools, you can troubleshoot, extend, improve, monitor, and manage your home Wi-Fi network effectively.
FAQ
1. What are the essential components needed to set up a home Wi-Fi network?
To set up a home Wi-Fi network, you’ll need an internet connection from an ISP, a modem to translate the internet signal, a wireless router to create and manage the Wi-Fi network, and a computer or smartphone for configuring the network settings. Additionally, Ethernet cables are useful for connecting the modem to the router and other devices (Broadband Genie).
2. How do I choose the right location for my wireless router?
The optimal location for your wireless router is a central position in your home, away from obstructions like walls, windows, and appliances that cause interference. It’s best to avoid placing the router near microwaves or in the kitchen, as these can significantly disrupt the Wi-Fi signal (Cable.co.uk).
3. How can I secure my home Wi-Fi network?
To secure your network, change the default admin password of your router to a strong, unique password. Also, consider changing the Wi-Fi network’s SSID and password to something unique. Regularly updating the router’s firmware and using WPA2 or WPA3 security standards are also key steps in securing your network (Broadband Genie, HighSpeedInternet.com).
4. What should I do if I experience weak Wi-Fi signals or coverage issues?
If you’re facing weak signals or coverage issues, try repositioning your router to a more central location. You can also use Wi-Fi boosters, extenders, or mesh network systems to extend the range of your network. Updating the router’s firmware can also improve performance and coverage (Cable.co.uk, HighSpeedInternet.com).
5. How do I connect devices to my home Wi-Fi network?
To connect devices like smartphones, tablets, or laptops to your Wi-Fi network, select the network’s SSID from the device’s Wi-Fi settings and enter the password. For devices that support Ethernet connections, you can directly connect them to the router using an Ethernet cable for a more stable and faster connection (HighSpeedInternet.com).
